Wednesday 27 December 2017

Get Upto Rs.180 cashback for every order you place through CashBurp

Get Upto Rs.180 cashback for every order you place through CashBurp
Cashburp is a great website that offers good cashback for your online purchases. Currently they have cashbacks available for the orders placed from MyVishal website but it is expected that they would add more online stores in the list of cashback eligible sites.
The best thing about this website is that it offers cashback upto Rs.180 to 200 per order and there is no minimum order amount required. For example, if you buy a T-Shirt of Rs.199 from MyVishal store through Cashburp, you will get Rs.180 cashback and the effective amount for your purchase would be Rs.19 only, isn't it cool?

Let's have a look about how to get started and you must follow every step I'm gonna explain here very carefully otherwise your cashback will not be listed in your cashburp account. It is personally tested by me and I've really got the cashbacks and that's the reason I'm sharing the details with you all. Let's get started:

1. First of all, open cashburp website from THIS LINK and sign up for an account.
2. After signing up, open a new tab and sign up on MyVishal website using THIS LINK.
3. After signing up on both the websites, sign into both of them.
4. Now you can close the myvishal tab. From the cashburp website's homepage, you will see the top stores' list. Click on the "MyVishal" store button and it will open the list of available offers for MyVishal store.

click myvishal store

5. Choose any of the offer and click "View Coupon" button next to it. A new tab will open with a coupon code and the previous tab will be redirected to MyVishal website. Now make sure that you place your orders from the MyVishal tab which was redirected in the cashburp's previous window. Otherwise your cashback might not be listed in the cashburp account.

list of MyVishal coupons

6. Make sure you are logged into MyVishal and Pick any product of any price you like from the MyVishal window and at the time of checkout, apply the coupon code you got in the new tab of Cashburp. As an example, you may use POSTBACK10 to get 10% instant discount on your cart value.
7. Make the payment and complete the order.
8. Now from the cashburp website, check Menu > Account > My Cashback section and you will see that your cashback will be in Pending status.

cashback status

9. The cashback will be approved after 45 days of the product delivery and then you can withdraw it in your paytm wallet.

approved cashbacks
paid in paytm

10. Make one thing clear that if you cancel or return your product, then the cashback status will be rejected, so make sure your orders are genuine.
11. I recommend placing orders one by one because for every order number, you will get the cashback, so suppose you have to by a Shirt and a Jacket, instead of buying them at once by adding them both in the single cart, order them one by one because it will create two order IDs and you will get cashback for two orders.
12. That's it. If you still have any doubts, drop your comments below and I'll reply. Happy Shopping!

Note: Always make sure to buy the products from the MyVishal tab which is redirected through Cashburp site to be eligible for the cashback.
Share:

Thursday 5 October 2017

Fix "The program can’t start because VCRUNTIME140.DLL is missing from your computer" Error

Fix "The program can’t start because VCRUNTIME140.DLL is missing from your computer" Error
While opening any app in your windows machine, if you encounter an error – "The program can’t start because VCRUNTIME140.DLL is missing from your computer" then you need to troubleshoot a few things which I'll let you know about in this post. But before troubleshooting the issue, let me tell you the reason behind this error. This error messages pops up when you try to open an application that requires VCRUNTIME140.DLL file but due to any corruption or data loss, it is not able to access the file. VCRUNTIME140.DLL is a Microsoft C Runtime Library application extension which is located in the System32 folder of the C:/Windows directory. It's size is around 86KB and it is installed by Microsoft Visual Studio. Any missing file from Microsoft Visual Studio runtime library can case such errors to be popped up. Let's see how to fix this error:
  • First of all, run the following commands in cmd with admin rights.
sfc /scannow
Dism /Online /Cleanup-Image /RestoreHealth
    • If the problem is not fixed by running the above commands, you can try to download the missing dll file from internet and paste it in the location where it is supposed to be, usually it is C:/Windows/System32. After pasting the dll file, restart the computer and check if the application starts working.
    • The other possible solution is to install the latest from Microsoft Visual C++ Redistributable Package from here.
    • Try to re-register the dll file. Read the process Here.
    • If the above two steps don't work, then try uninstalling the appplication completely using Revo Uninstaller Pro and delete all the remaining leftovers of the application and reinstall the application. Most of the times, new Microsoft Visual C++ Redistributable Packages get installed at the time of the installation of the application itself.
    • If none of the above steps worked, then repair your windows OS with the installation media or perform an in-place system upgrade which will repair all the corrupted files of your operating system.
    Similer Errors with same solution:
    api-ms-win-crt-runtime-l1-1-0.dll is missing
    MSVCR110.dll is missing
    d3compiler_43.dll is missing
    MSVCP140.dll is missing.

    For more tips and tutorials about windows error codes and troubleshooting, keep visiting PC Tricks Guru and subscribe to my mailing list to get the latest updates delivered in your mail box directly.
    Share:

    How to register and unregister dll files in Windows

    How to register and unregister dll files in Windows
    Windows Operating system uses dynamic link libraries to run applications because dll files hold multiple codes and information to run the programs. Sometimes if any dll file gets corrupt then the application which uses the information from that specific dll file doesn't open and gives error messages. In this situation, we can fix the dll issues by registering the dll file which is not working properly. Here is how you can register and unregister dll files in Windows (the same method is followed for ocx files too):

    UnRegister a dll file
    To unregisted a faulty dll or ocx file, open command promt with admin rights and run the following command:
    regsvr32 /u "path & filename of dll or ocx"
    example :  regsvr32 /u msxml3.dll
    To go into the system 32 directory, you may type the command "cd C:/Windows/System32" and press enter in command prompt with admin and then

    Register or Re-Register a dll file
    To registed a faulty dll or ocx file, open command promt with admin rights and run the following command:
    regsvr32 "path & filename of dll or ocx"
    How to register and unregister dll files in Windows

    You may download a tool for registering dll files frm here.
    Keep visiting pc tricks guru for more tips and tricks.
    Share:

    Wednesday 4 October 2017

    Get upto 50% cashback on Amazon Prime Subscription

    Get upto 50% cashback on Amazon Prime Subscription
    Amazon prime is a service offered by Amazon which has special benefits for it's subscribers. If you subscribe to Amazon prime service, you can get free shipping for all prime eligible products and free one or two day delivery. Prime subscribers get the early access to most of the lightening deals too which can be grabbed with huge discounts. With amazon prime subscription, you can watch premium video content (TV Shows, Movies etc) on Amazon Prime Video app and you can get access to Amazon exclusive video content also.
    Right now, if you plan to get Amazon prime subscription in the festiv season, some great offers are available for you. The regular price of Amazon Prime subscription is Rs.499 per year but you can get cashback upto Rs.250 on your prime order. Check the Amazon Prime Subscription offers below:

    1. Amazon Prime Vodafone Offer: This offer is only for Vodafone users who want to buy Amazon Prime subscription for the first time. All you need to do is download myvodafone app from playstore and open it. After opening the vodafone app, you will see the vodafone amazon prime video offer banner. Tap over it and download the amzon prime video app. Install the app and sign into your amazon account. You should see the banner to subscribe for Prime. Tap over it and subscribe for the amazon prime. You will get Rs.250 cashback within 30 days of Amazon Prime subscription.
    Here is the link for the details: Amazon Prime Vodafone Offer

    2. Amazon Prime Samsung MyGalaxy App offer: If you are a samsung mobile user and if you have installed Samsung MyGalaxy app, then also you can get Rs.250 cashback on your Amazon Prime Subscription. Just open MyGalaxy app and click on the Amazon Prime banner and subscribe through the banner. After successful subscription of Amazon Prime, you will get Rs.250 cashback within one month.
    Here is the link for the details: Amazon Prime Samsung MyGalaxy Offer

    3. Amazon Prime Micromax Offer: In your micromax device, you should get the notification to subscribe to Amazon Prime Video if you have installed amazon app and micromax apps. Just click on the notification and subscribe to Amazon Prime. You will get Rs.200 cashback within one month of subscription transaction.
    Here is the link for the details: Amazon Prime Micromax Offer

    4. Amazon Prime OnePlus 5 Offer: If you are a user of OnePlus 5 phone then open the preinstalled Amazon Prime Video app, login and subscribe to Amazon Prime service. After subscription, open the app and play any video for at least 10 minutes. You will get cashback of Rs. 250 within 30 days of your first streaming.
    Here is the link for the details: Amazon Prime OnePlus 5 Offer

    Note: The cashback amount will be credited in your amazon pay balance. For every offer mentioned above, make sure to play videos on amazon prime video app for at least 20 to 30 minutes to make sure that you don't miss the cashback oppertunity. So if you are eligible for the cashback offer, don't forget to subscribe to Amazon Prime to get the prime benefits and cashbacks.
    Share:

    Monday 18 September 2017

    Get Free Cash - Google Launches Tez : A UPI based Payment System in India

    Google Launches Tez : A UPI based Payment System in India
    Google has launched "Tez", it's first UPI based payment system in India. UPI is one of the best ways for cashless and cardless transactions which is fast and secure. All you need is to link your bank account with the UPI enabled app (PhonePe, Kotak 911 etc) and you will get your unique UPI payment address. If any other user sends money to your UPI address, the amount will be credited instantly in your bank account and the best thing is, there are no transaction charges like IMPS transfer. Let's see how to install and use the Google's Tez app:

    1. First of all, you need to know that to be able to use UPI, you must have a bank account and a debit card for your account because you will need to use the debit card details to generate UPI address and UPI transaction PIN. The most important thing, your mobile number which you use to sign up must be linked with the bank account becasue the app will send a one time password to link your bank account with the UPI app (Don't panic, it is safe and there won't be any unauthorized transactions from your account)

    2. After making sure you have fulfilled all the requirements, you can start creating your UPI address with Tez app. Download and install Tez app in your phone using this link : DOWNLOAD HERE

    3. After clicking the link, you will be redirected to google play store. Install the app in your phone and open it. It will ask you to select language, choose any language of your choice and click on the small arrow icon from the top right corner of the screen (see screenshots).

    install tez

    4. On the next screen, Tez will ask for your mobile number. Enter your mobile number that is linked with your bank account and make sure that you are using the same mobile number in your phone in which you are installing Tez app. After entering the phone number, it will ask you to select your google account.

    sign up

    5. On the next screen, it will ask you to secure Tez app. You can either use your current screen lock pattern or can set a new PIN. After setting the protection, app will open.

    protect

    6. Now close the app and reopen it. You will see an option to add bank account with the app. Tap over "Add Bank Account" and select your bank in which you have your account opened.

    link account

    7. After you select your bank, Tez will try to find and verify whether any account in that particular bank is linked with your mobile number or not. If any account is linked with your phone number in the selected bank, it will show you the account details and will ask you to set a UPI PIN. If you have not used your account with any other UPI app and it doesn't have any UPI PIN, you can set a new UPI PIN (that will require your debit card details) and if you already used your account with any UPI app, you can use your existing UPI PIN to finish the linking process. Your own UPI ID for Tez app which can be used to receive payments from others will be listed with your account, you may make a note of it, if you want.

    upi pin

    8. After successful linking of the account and UPI creation, open the app and tap over "Pay Using Phone or Account Number, QR or UPI ID" option as shown in the screenshot. On the next screen, select whether you want to send money through account number or UPI address.

    start payment

    9. I'm testing the app by sending Rs.100 to my account account through UPI. You can also send money to any UPI address or bank account using the options available in the app.

    send to upi
    money sent

    10. That's it. You can use Tez app for your cashless transactions now.

    REFER AND EARN PROGRAM
    Google is running a refer and earn program for the Tez app. If you sign up for it and send money to another Tez user, both of you will get Rs.51 as referral reward which will be credited in your bank. To get your Rs.51 reward, you may send Rs.1 only at the upi address ashutoshkushwaha22@okhdfcbank and after the successful transaction, you will get Rs.51 back in your account.

    Here is a small explaination:

    1. If you install the Tez app from my referral link, you should see my photo in the app home screen. If you don't see, then also you can use pay using "Phone or account number option" to ashutoshkushwaha22@okhdfcbank.

    2. If you click on my pic, you should see a message "Welcome to Tez! Make your first payment and we each get Rs.51!"

    3. At the bottom, click "Pay" and transact Rs.1 to me and after the successful transaction, you will get a message "You earned a reward".

    send Rs.1

    4. Tap over "You eared a reward" and you should see that Rs.51 has been rewarded to you. In the app's homepage, you can see a rewards and offers section, you may check your rewards by clicking "Rewards" too.

    get Rs.51 cashback

    5. This is an additional step and you can leave it. But if you transact Rs.51 to any other Tez user which you never paid, you and him, both will get a scratch card which will give you extra amount as bonus.
    bonus cashback

    So don't miss join now to earn free cash as much as you can. :-)

    Note: If you already have installed Tez without using any referral link, then you can still get Rs.51 referral reward. Just tap on the 3 dots from the top right corner of tez app to open the menu and tap "Referral Code" option. A new page will open asking you to enter referral code, enter 3h5AZ there and apply. That's it, if you send Rs.1 to any tez user, you will get Rs.51 reward instantly in your account.

    Keep visiting PC Tricks Guru for more tips and tricks.
    Share:

    Thursday 10 August 2017

    Get assured cashback upto Rs.1000 for doing recharges and bill payment

    PhonePe - Get assured cashback upto Rs.1000 for doing recharges and bill payment
    In this digital era, we all are dependent on our gadgets and spend our most of the time with them. Those days are gone when we had to stand in long queues and wait for the whole day to pay our bills and top-up our phones. Today, we just use our phones or computers and pay our bills online without any queue. Some apps like PayTm, Freecharge, Mobikwik and Mobile Banking apps etc make it easy to do recharges and pay utility bills.
    There is one app which I like the most among all the other apps and the best thing is, it gives me good amount of cashback for my transactions. The app is - PhonePe (download from here). You can get 50% to 100% cashback on your first recharge, upto 100% cashback on UPI transaction, upto 30 to 50% cashback on your consecutive recharges and upto 100% cashback on your utility bill payments. Isn't it cool? Let's see how can you use this app and link your bank account with the app to enable UPI and enjoy good amount of cashback.

    1. Download and install PhonePe app. (click here to download)
    2. After installing the app, open it and sign up.

    sign up to phonepe

    3. After signing up, login to your account and Add your bank account to enable UPI. To add the account, tap "My Account" and then tap "Bank Accounts".
    3. Now tap "Add New Bank Account" (option might be different for different versions of the app, but the process is very easy and you can understand it easily by following the on screen instructions)

    link account

    4. After selecting the bank, to search for your bank account, PhonePe app will send a SMS from your mobile number to verify that whether any account with the bank is linked with your mobile number or not, if any account is found, you will see it's details on the screen.
    5. Just add the fetched account and then it will ask you to create your UPI address. UPI address is just like an email address but it works as an account. If any user wants to send money directly to your bank account, he just have to send money to your UPI address and the amount will be credited in your account instantly..
    6. Once your account is linked with the app and UPI address is created you are ready to use it and grab cashbacks.
    7. If you transact through PhonePe to do your recharges and pay your bills, it will automatically give you cashback without using any promo code. PhonePe runs different campaigns during which it gives it's users good amount of cashback against their transactions.
    8. If you send money to any UPI address or Bank Account, you will get 50% to 100% cashback (depends on the currently running campaign). Not only this, you can get Rs.100 per referral too which can be used to do mobile recharges, pay bills or shop online.

    So what are you waiting for, install PhonePe app from here and link your account to start getting good cashback on your transactions.
    Share:

    Sunday 16 July 2017

    Get refund for your Amazon order without returning the product : Scam Alert

    Get refund for your Amazon order without returning the product : Exposing the Scam
    In facebook or in some forums, you might have seen some guys offering refund for your amazon products without returning the product, even after delivery of the product. Sounds interesting, right? I also went through a post in a facebook group where a guy posted that he will provide refund for Amazon products. He was asking for 30% of the amount as his commission once you get the refund in your account. The only condition was that the product must be delivered within 30 days of making the deal with the guy.
    I knew that he would definitely do any kind of scam to get the refund because earlier also, people were fooling amazon saying that their order status shows delivered in the amazon account but they never got the product delivered to them and amazon was providing refunds to them without any investigation from their side.
    I thought I should play prank on the scammer to know exactly what he is going to do with amazon to get the refund. So I contacted the guy and told him that I want to get the refund. He asked my user id and password. I gave him my amazon login id and password (I changed the password temporarily before providing it to him) and after a few minutes, I got an email from amazon support that the conversation was ended in between and I reported that the ordered item was missing in the box. After a few minutes, I got another mail from amazon that the refund for my order has been started and the amount will be sent to my credit card.
    The guy who asked for the refund on behalf of me tried to convince me that he is going to provide me the refund, not amazon. But I got the "Trick" he was using to scam amazon and I told him that I'm going to report amazon about this fraud. (I told him that I'm a government employee and I can't be involved in this scam as it would ruin my career, lol, but later I told him that the whole process was actually a trap to expose the illegal practice he had been doing from long time). He tried threatening me that he is going to file a complaint against me in Amazon and then he deactivated his facebook account.
    Well, the whole thing was funny for me but it is actually a serious issue for Amazon. These guys are causing loss to amazon and this is not a right thing according to me. I'm a customer of Amazon and it never disappointed me with its services so I thought I should be good for Amazon too. And yes, I sent the mail to amazon and sent a tweet to amazon to cancel the refund request for my order which they did before the payment was credited to my account, thank God! I'm uploading the single screenshot of the whole conversation with the scammer and the refund mail from Amazon.

    Check the screenshot of conversation: https://drive.google.com/open?id=0B1WpxeCQzpcPTk5FRHdESUxmSlk (Zoom the image to see the text clearly)

    This is the mail which let me know what did that guy do to request for refund. That's why I came to know that he said that he got the product delivered but the box was empty. Check the screenshot here : https://drive.google.com/open?id=0B1WpxeCQzpcPUWJsN3RfSENjUE0

    In the previous mail, the immediate refund request was cancelled and the case was escalated to accounts or refund team, and surprisingly they processed the refund. See the screenshot of  the Refund Mail: https://drive.google.com/open?id=0B1WpxeCQzpcPYVVhQU9jYThMVEE

    I've seen some proofs that people got full refund for iPhones too using this scam. Just one request to amazon, please check the things before providing the refunds for the cases that claim "My ordered item was missing from the box" because it is very rare and there are 99% chances that the person who is reporting this kind of situation to get refund is a SCAMMER.
    I hope amazon will improve their policies for the refund and will do the full investigation for these kind of fraud in future and will minimize the loss to their sellers and their own company.

    ***UPDATE***
    I had a conversation with Amazon India team on twitter and on their chat support link and reported this issue and got the assurance that Amazon will work internally to look for this matter and will take action against the scammers. Today, some random guys shared the screenshots of mails they received from amazon. Looks like Amazon has started taking action agains the culprits.
    amazon mail
    Share:

    Thursday 22 June 2017

    How to sort excel sheets within a workbook

    Microsoft Excel is one of the most used spreadsheet application and has lots of features that makes data processing easier. In excel, we can use macros too and in this tutorial, I'll write about sorting excel sheets within a workbook. Follow the steps given below:
    1. Open Excel and create some sheets in the workbook. Rename them and arrange them randomly (I'm assuming an example sheet to start with). I've named the sheets as navy call list.
    create sheets

    2. Now right click on any sheets and click "View Code" as shown in the screenshot below.

    view code

    3. Now "Microsoft Visual Basic for Applications" window will be opened. Click on "Insert" and click on "Module".

    insert module

    4. A new module will be created and a blank editor will appear. Copy and paste the following code in the editor:

    Sub Sort_Active_Book()
    Dim i As Integer
    Dim j As Integer
    Dim iAnswer As VbMsgBoxResult
    '
    ' Prompt the user as which direction they wish to
    ' sort the worksheets.
    '
       iAnswer = MsgBox("Sort Sheets in Ascending Order?" & Chr(10) _
         & "Clicking No will sort in Descending Order", _
         vbYesNoCancel + vbQuestion + vbDefaultButton1, "Sort Worksheets")
       For i = 1 To Sheets.Count
          For j = 1 To Sheets.Count - 1
    '
    ' If the answer is Yes, then sort in ascending order.
    '
             If iAnswer = vbYes Then
                If UCase$(Sheets(j).Name) > UCase$(Sheets(j + 1).Name) Then
                   Sheets(j).Move After:=Sheets(j + 1)
                End If
    '
    ' If the answer is No, then sort in descending order.
    '
             ElseIf iAnswer = vbNo Then
                If UCase$(Sheets(j).Name) < UCase$(Sheets(j + 1).Name) Then
                   Sheets(j).Move After:=Sheets(j + 1)
                End If
             End If
          Next j
       Next i
    End Sub

    code

    4. Now click on "File" and "Close and return to Microsoft excel".

    exit from the code editor

    5. Now in Excel, click on "View > Macros > View Macros". It will open the saved macros.

    view macros

    6. In the Macro window, you should see "Sort_Active_Book" macro. Click on it and click "Run". It will open a prompt, click on Yes if you want to sort the sheet in ascending order, click NO if you want to sort the sheet in descending order.

    run macro
    prompt

    7. That's it, you can see that the sheets in your workbook are sorted.

    sorted sheets

    Keep visiting for more tips and tricks.
    Share:

    Monday 15 May 2017

    What is a Ransomware and how to prevent it

    Ransomware is a kind of malicious software which encrypts the files of infected PC upon execution and it's designed to block the access of files in a computer until a sum of money is paid to the hacker. Once the money is paid, the hacker sends a decryption key to the victim which can be used to decrypt the files and get the access back. Most of the times, even if you pay the amount, the victim doesn't get any decryption key and it is almost impossible to track the attacker because they accept the money through bitcoin in encrypted form that is very difficult to track.

    What exactly happens when a pc gets infected by a Ransomware?
    Well, earlier, ransomware software were too easy to get rid of for a little techie people who knew about windows task manager and startup items. I have personally analyzed some old ransomwares and what they did was just executed themselves and created a startup entry for their main application to show that scary screen which says that your computer or files have been locked and you need to pay some money to the attacker to get back the access to the pc. It could be easily closed by ending the ransomware process from task manager and the malicious file could easily be stopped from auto executing by running msconfig command through RUN and deleting the startup entry of the ransomware software. Some ransomware create events in windows to auto download and execute themselves even after deleting the ransomware software and these kind of ransomwares are bundled with software cracks which are actually malwares. But that too could be stopped by deleting the particular event or task from the computer.
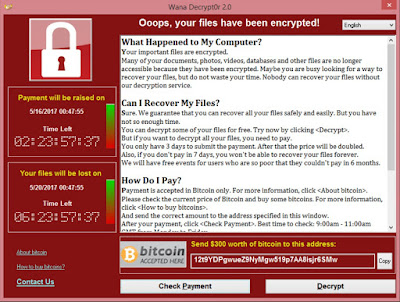
    But these days, ransomware are being coded in a much complicated way that are FUD (fully undetectable) for so many anti-virus software and the encryption technology used by the ransomware is very difficult to crack so they are getting more dangerous as they are not detectable and non-removable by any antivirus. Although some antivirus vendors like KasperSky and Malwarebytes are providing decrypting tools to recovered the locked files, there are still so many ransomware available online which decryption algorithm is still not available.

    Recently "WCry", referred as "WannaCry" ransomware infected about more than 57000 computers worldwide this friday (12th May 2017) and created a panic among the computer users. It affected hospitals, schools, offices and government agencies. After infecting the computer, it's asking to pay $300 to unlock the files and I'm not sure whether the attacker really sent any decryption key to decrypt the files for anyone who paid the amount.
    wannacry ransomware screen
    Well, this ransomware was accidently stopped by a cybersecurity researcher which is tweeting with the user name @MalwareTechBlog. The researcher bought the domain name used by the ransomware on a website called NameCheap.com for $10.69, and set it up on a server in Los Angeles which stopped the Ransomware as the domain name used by the ransomware was never booked and setting up the domain on the server stopped the ransomware to spread.

    How to prevent from getting infected with ransomware?
    But still the risk is not over and the attacker might spread the ransomware again by changing the code of it and by making it more difficult to decrypt. So what can be actually done to stop the ransomware to infect your PC? Well, there is no any 100% working solution available for it yet but yes, with the few precautions, you can prevent it. I'm listing a few tips which you can follow to be safe from the ransomware:
    1. Don't open any file which you receive through mail from unknown people. The file might be of any extension so don't think that you are opening a safe file and get trapped.
    2. Use sandbox before opening any suspicious file which you think might not be any virus. Using a sandbox creates a virtual space in your computer and keeps your computer safe in case if you encounter any virus in your sandbox.
    3. Install any good antivirus and anti-malware in your computer and keep it up to date. You may use Malwarebytes, Kaspersky, AVG Internet Security etc.
    4. Apart from antivirus, you can use Anti-Ransomware tools too such as Bitdefender AntiRansomware, Malwarebytes Anti-Ransomware, EMET, Kaspersky Anti-Ransomware tool etc.
    5. Disable SMB service in windows services to prevent the ransomware to be executed. To do so, open appwiz.cpl from RUN and click Turn Windows Features ON or OFF. Now look for SMB 1.0 and uncheck it and click OK. Usually you can find this option in Windows Server Edition OS.
    program and features
    turn windows features ON or Off
    Alternatively you can run the powershell command too which is given below:
    "Disable-WindowsOptionalFeature -Online -FeatureName smb1protocol"

    Note: If you are sharing files among different computers, then don't turn off SMB feature. File sharing won't work after disabling this feature.

    6. Install all the security patches and updates from Microsoft to keep your PC safe. TO install the important security patches, use the following links:
    http://www.catalog.update.microsoft.com/Search.aspx?q=KB4012598
    https://technet.microsoft.com/en-us/library/security/ms17-010.aspx

    Since these too are not sufficient to prevent a user from getting infected from a ransomware so the only thing which can prevent your computer from being infected is using strong firewalls and use of common sense.

    That's all for today. Keep visiting PC Tricks Guru for more tips and tricks.
    Share:

    Sunday 12 March 2017

    How to suspend or cancel your Jio SIM yourself

    How to suspend or cancel your Jio SIM yourself
    After using the free services of Reliance Jio, so many users want to suspend or cancel the Jio SIM and there are so many reasons behind it. The first reason is that users are afraid of Porting their numbers into Reliance jio because they are not sure what plans will Jio offer in future and the major problem is the network coverage. Reliance jio doesn't work in 2G/3G mode but other SIM Cards do, so usually in the areas where 4G network coverage is not so good, they won't be able to use their phone and can't make calls. Second is internet speed, I personally noticed that in most of the areas, JIO speed is very less and sometimes it doesn't work at all, even if we see full network signal indicated by the device. But with our primary networks, we can switch to 3G or even 2G in case of urgent data need. Third is frequent network drop which is happening from last few days. So overall users are not sure how will the Jio network perform that's why they don't want to switch to Jio.
    Let's come back to the main topic, i.e. How to suspend or cancel your Jio SIM yourself:

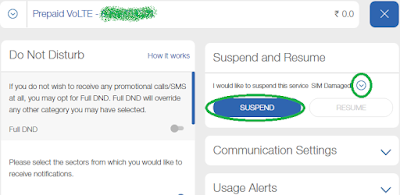
    • Login to the JIO Website from the link: https://www.jio.com/Jio/portal/jioLogin (Use your login credentials of MyJio app to login)
    • Once you are logged in, you will see a settings button on the top right screen. Click on that.

    How to suspend or cancel your Jio SIM yourself

    • Now you will see "Suspend and Resume" option, click on that.
    • Click on the "I would like to suspend this service" dropdown button.
    • A pop up will appear on the screen,  select any of the options, like "SIM Damaged".
    • Now click on Suspend. That's it. You will see a message that your request to suspend the service has been submitted successfully.

    How to suspend or cancel your Jio SIM yourself
    How to suspend or cancel your Jio SIM yourself

    • After submitting the request, your SIM will be suspended within 24 hours.

      That's it. For more tips and tricks, keep visiting PC Tricks Guru.
      Share:

      Saturday 25 February 2017

      Customize office C2R installation for Office 2013 and 2016 with Office Deployment Tool

      Customize office C2R installation for Office 2013 and 2016 with Office Deployment Tool
      MS Office is one of the most used office suit for all the office needs worldwide and it is available in different versions (2013/16/365). In the older versions, Microsoft used MSI installers which had the option to customize the installation of office, it means we could choose which application we want to install and which we don't but in the new versions of office Microsoft we can't customize the installation because Microsoft is using click to run installer for the installation of office. If you ask Microsoft about custom installation, they would say that it's not possible but actually it is possible using the office deployment tool. So in this article I'll tell you how to customize the office installation.
      Follow the steps given below:

      1. First of all download the offline ISO file of office from office.com/myaccount or from any mirror site (I'll use office 2016 Pro Plus in this tutorial).
      2. After downloading the ISO file, mount it or extract it.
      3. Inside the ISO file, you will get one folder, "Office" and two files, "autorun.inf" and "setup.exe". Now download the office deployment tool from this link: https://www.mediafire.com/?rg6cmy7y6i18lvq
      4. After downloading the Office deployment tool, extract the file and you will get 3 files there, "Configuration.xml", "EULA" and "Setup.exe".
      5. Now open the configuration.exe in notepad and you will see some code there which is given below:
      <Configuration>
      <Add SourcePath="YOUR OFFICE INSTALLATION FILE PATH\" OfficeClientEdition="32">
      <Product ID="ProPlusRetail">
      <Language ID="en-us" />
      <ExcludeApp ID="Access" />
      <ExcludeApp ID="Groove" />
      <ExcludeApp ID="InfoPath" />
      <ExcludeApp ID="Lync" />
      <ExcludeApp ID="OneDrive" />
      <ExcludeApp ID="OneNote" />
      <ExcludeApp ID="Outlook" />
      <ExcludeApp ID="SharePointDesigner" />
      <ExcludeApp ID="Visio" />
      </Product>
      </Add> 
      6. You can edit the code as per your convenience and customize the office installation. You can replace the source path with your own path where you have kept the office installation files which you got after extracting the ISO. You can edit the value of office client edition to 32 if you want 32 bit setup and 64 if you want 64 bit setup. In the product ID value, you can type the product ID which you are using, in my case it's ProPlusRetail. In the same way, you can edit the language ID also. Now you need to decide which app you don't want to install and then add the app name in the ExcludeApp ID value. You can get the Product ID and App ID details from this documentation: https://technet.microsoft.com/en-us/library/jj219426.aspx#bkmk_productelement
      7. Once you are done with editing the xml file, save it.
      8. Now open the office deployment tool folder and press and hold the shift key and while holding the shift key, right click in the empty area of the folder and click "Open Command Window Here". Command prompt will open.
      9. Now type the following command: setup /configure configuration.xml and hit enter key.
      10. That's it. Office installation will begin and only those components will be installed which were allowed in the xml file.
      For better understanding, you may watch the video tutorial given below:


      Keep visiting for more tips and tricks.
      Share:

      Tuesday 14 February 2017

      How to reset Microsoft Word settings to default

      How to reset Microsoft Word settings to default
      Microsoft Word is the most used word processing application worldwide and it is popular on both Windows and Mac operating systems. It is the part of the Microsoft Office package which include other essential office applications. In MS Word, sometimes we make some settings which we forget later and it disturbs the whole formatting of any new document. In this situation we need to reset the word settings to default and there is a very simple method for that but note that follow the steps which I'm giving carefully because we are going to make changes in Windows Registry and if you try to play around with it, your OS might crash and your office application might start misbehave.

      1. First of all open RUN box by pressing windows and R keys together.
      2. Now in the RUN box, type regedit and click OK. It will open registry editor.
      3. Now in the registry, navigate to HKEY_CURRENT_USER > Software > Microsoft > Office > 12 > Word and expand it.
      (The number 12 might be different as per the version of office installed in your computer)
      4. Now you should see "Data" folder there. Just right click on it and delete it.

      How to reset Microsoft Word settings to default

      5. Now open your Microsoft word, it should be rest to it's defaults and you can use it without any problems.

      Keep visiting for more tips and tricks.
      Share:

      Tuesday 7 February 2017

      How to disable useless google apps in non rooted android phones

      How to disable useless google apps in non rooted android phones

      Disabling google apps in non rooted android phones is a big question among android phone users and personally I also don't like being forced to keep the bloatware in my phone for no reason. These days, most of the android smartphone makers have their own custom ROMs ported over android OS and they have better apps available than the default google apps but still there is no any option to uninstall the pre installed google apps like hangouts, google play music, google play movies etc and it is possible only if you root your phone but most of the android users are not so advanced to understand the TWRP recovery and ROM flashing so they are always forced to keep the bloatware in their phones.
      In this article, I'll tell you the process to disable the google bloatware in your android phone. Note that this process will not uninstall them but it will disable the bloatware and you won't be able to see their icons. Follow the steps given below:

      1. Open google play store in your phone and tap over "Help and Feedback" option.
      2. Now you will see the list of some help articles for google play. Tap over "Browse All Articles".
      3. Now tap on the article "Uninstall, disable and delete apps".

      How to disable useless google apps in non rooted android phones

      4. Once the article is open, tap over "Tap to go to application settings".
      5. Now the list of installed applications will open on the screen.
      6. Tap over the application you want to disable and then tap "Disable". If it asks to uninstall the updates, uninstall them.

      How to disable useless google apps in non rooted android phones

      7. That's it, the application will be disabled. Using the same method you can disable all the useless google bloatware which you don't need and do better memory optimization for your phone.
      Keep visiting PC Tricks Guru for more tips and tricks.
      Share:

      Custom Search Box

      Earn Money With Crypto

      WazirX

      Offers and Deals

      Blog Archive

      Contact Form

      Name

      Email *

      Message *