Showing posts with label windows 10. Show all posts

Thursday, 8 September 2022

Fix 100% CPU Utilization in Windows 10/11

Fix 100% CPU Utilization in Windows 10 or 11
While using Windows OS, there are several processes which keep running in the background which use system resources, such as CPU and Memory. These processes cause system slowdown issues if not optimized properly. Usually Windows is smart enough to prioritize critical system processes to make sure that the OS is utilizing the hardware on an optimum level, but sometimes, due to 3rd party applications (such as antiviruses) and malware, some processes start utilizing the CPU at the maximum level and CPU utilization reaches 100% which slows down the overall system performance. In some cases, if the system is overheating or there is any hardware fault in CPU or system Fan, then also this kind of issue appears. I am sharing some of the steps which you can use to fix the issue.

1. Scan and restore corrupted system files using "System File Checker" utility

Before running this utility, make sure to run Deployment Image Servicing and Management (DISM) tool by running this command in elevated cmd window: DISM.exe /Online /Cleanup-image /Restorehealth

DISM uses Windows Update to provide the files that are required to fix corruptions. But if the OS is already broken and most of the components are not working in Windows, this command would not be so helpful.

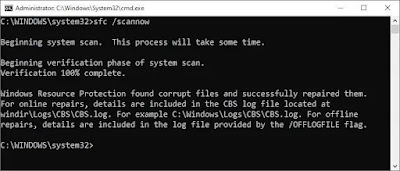
After running the DISM command, in the same elevated command prompt window, run the following command sfc /scannow and press enter key. This command will scan all protected system files, and replace corrupted files with a cached copy that is located in a compressed folder at C:\Windows\System32\dllcache.

running DISM
sfc /scannow

2. Set the process priority to low, if it is utilizing too much CPU resource

Open task manager and check which process is using more CPU. Right click on the process and click on "Go to details" and then it would show up the actual exe file which is creating that process. Simply right click on the exe file name, then click on "Set Priority" and click "Low". This step would ensure that the process would be restricted from using maximum CPU resources.

set process priority to low

3. Install all pending Windows updates

Click on Start and then click on Settings. From there, open Windows updates and check for all the available updates (cumulative, feature updates and other optional updates) and install them. Once the updates are installed, restart the system and check for the CPU utilization.

update windows

4. Install all system drivers (including BIOS and Intel Turbo Boost Driver)

Open your system manufacturer's website and check for the downloads section. From the downloads section, download all the latest drivers for your system. Drivers include BIOS, VGA, Audio, Chipset, Dynamic Tuning Driver, Intel Turbo Boost driver etc. If your manufacturer provides any tool for auto update of drivers (such as HP Support Assistant, Dell Support Assistant, Lenovo Vantage etc), then use the tool to auto update the drivers to the latest version.
But I would personally recommend using IObit Driver Booster tool which checks for the best performing drivers for your device and auto downloads and installs them. I am personally using it and trust me, it is awesome.
Once the drivers are updated, restart the system and check the system performance. Make sure not to miss updating the BIOS to the latest version, because BIOS would usually require manual updation from manufacturer's website.

update drivers

5. Create a high performance power plan

Most of the times, due to balanced power plan of the OS, processor is not utilized properly by the system processes which cause malfunction with the processor and system processes. This causes incorrect CPU utilization. So it is recommended to create a high performance power plan and set it as default so that system could run with its maximum potential. To create a high performance power plan, follow the steps below:
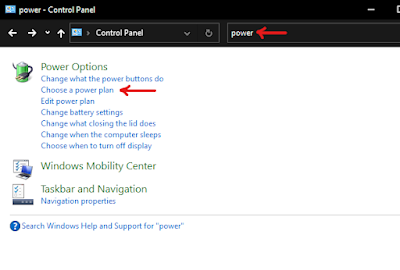
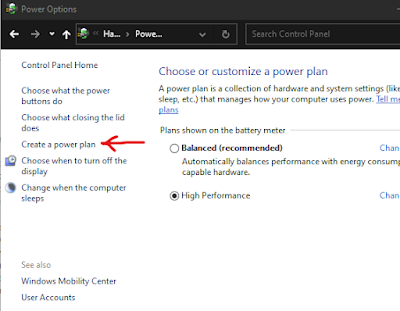
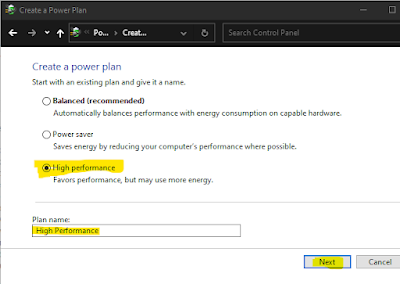
> Open control panel and in the search bar, type power, and then click on "Choose a power plan" and set the power plan to "High Performance". If it is not available in your system, then click on "Create a Power Plan". Now select "High Performance" and type the name of your power plan (you may use any name, I used High Performance) and then click on Next and finish. Once you are done with creating the power plan, use it in power options. It should bring back the CPU utilization to normal.

choose a power plan
create power plan
create high performance power plan

6. Modify settings in registry

Before doing modifications in registry, make sure to take a backup of registry. Once you are done with the registry backup, navigate to this location in registry: HKEY_LOCAL_MACHINE>SYSTEM>CurrentControlSet>Control>Session Manager>Memory Management and double click on "Clear Page File Shutdown" and change the value data to 1 and click OK. Then restart the system and check if the issue still persists.
clear page file in registry

7. Disable P2P Share for Windows Updates

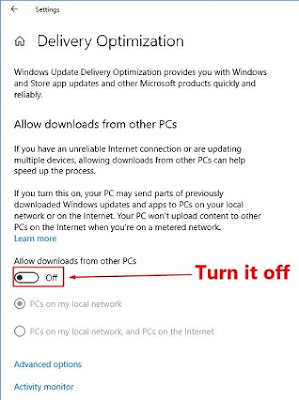
To disable P2P share for Windows update, click on Start, then go to settings and open windows updates. Then click on "Advanced Options", then click on "Delivery Optimization" and then turn off "Allow downloads from other PCs".
disable P2P

8. Uninstall Sophos client or update it to the latest version

It has been observed that Sophos Endpoint client and other Sophos products are also causing 100% CPU utilization issue with several systems. If your system too has any Sophos client installed, try to remove it or update it the latest version and check if it helps. It is a known issue with Sophos and they are expected to fix it with their future updates.

9. Perform clean boot and run a complete virus scan using Malwarebytes anti malware utility

Malware and viruses are also a major reason of the 100% CPU utilization issue. If a computer is affected by any malware, sometimes it exploits the ntoskrnl.exe file, which is Windows NT Kernel and System file. Its process is visible in task manager with the name "System" and it uses maximum amount of CPU. Although, this file is exploited by some 3rd party applications as well which may be installed in the computer. So first of all, try running the system in clean boot mode and check if the issue is resolved. If it is not resolved, run a complete system scan with a good antivirus, such as Malwarebytes antimalware tool. It should fix the issue.
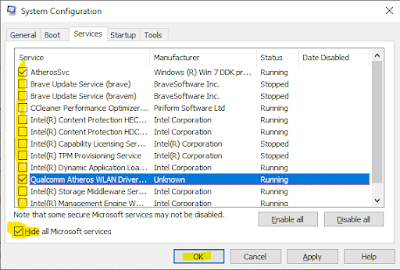
To perform clean boot, open msconfig.exe and then click on "Services". Then click on "Hide all Microsoft services" and then uncheck all the services except LAN, WLAN and Audio services, otherwise your internet would be disconnected and system audio will stop working. Then click on OK and restart your system.
clean boot

10. Factory Reset the OS/Reinstall Windows

If none of the above options worked, reinstall the OS or factory reset the OS and check if it fixes the problem. If it works, then update all the drivers and then install your applications one by one and check if the issue reappears after installing any specific driver or application. If the issue reappears after installing any specific application or driver, that would be the culprit. Uninstall it immediately.

11. Contact system manufacturer for hardware tests and part replacement

If the issue is not resolved even after OS reinstallation, then either system processor or the system fan is faulty which is causing overheating or processor malfunction. In some cases, I have observed that hard drive and memory also caused similar issues due to memory leak. So contact your system manufacturer and ask them to run hardware tests and replace motherboard along with the processor and fan. This would resolve the issue for sure.

Note: In some cases, it is observed that some systems using some specific models of TP Link routers also caused this issue and this was a known issue which is resolved. So if you find any user who has TP Link router which is very old and firmware is outdated, ask them to disconnect from the router and observe if the issue still remains the same.
Additionally, you can use tuneup utilities such as IObit Advanced System Care utility or any other good tuneup utility to optimize your system performance.
Share:

Wednesday, 6 October 2021

How to upgrade to Windows 11 on unsupported hardware without data loss

Windows 11
Windows 11 has been rolled out officially for all the users as a stable release on 5th Oct 2021. But many users are disappointed because Microsoft is not allowing them to upgrade to Windows 11 if their machines are not with latest hardware. To be able to use Windows 11, the machine should have 8th Gen or above processor, TPM 2.0 and secure boot enabled. Without these requirements, you would not be able to upgrade to Windows 11.

But there is a script that you can use to bypass the system check and easily upgrade to Windows 11 using the official ISO file of Windows 11. Make sure to disable windows defender before running the script otherwise it might not let the script run. Also, there is no harm in running the script and I already have personally tested it. Follow the steps given below to initiate the upgrade process:

1. Download Windows 11 ISO File from Microsoft's website. (https://www.microsoft.com/en-us/software-download/windows11)
2. After downloading the ISO file, download the system check bypass script from this link: Bypass Script Link
3. After downloading the zip file, extract it and run the Skip_TPM_Check_on_Dynamic_Update_v2.cmd file as admin.
4. Once the script is done with the registry modification, open the Windows 10 ISO and run the setup. You would see that it would allow you to install Windows 11, however it would ask you to accept the risks that may state that the system might not get security updates on unsupported hardware. You may click on accept and forget about it, all the updates would be delivered to the device without any issues.
5. Now proceed towards the installation and choose the upgrade option. Windows 11 installation would begin and once it is done, your system would restart and you will be able to login to Windows 11 and use it without any problems.

For more tips, keep visiting PC Tricks Guru.

Share:

Sunday, 8 August 2021

How to turn a website into Windows app

How to turn a website into Windows app
There are so many websites which we visit frequently using our computers and think that if there could be a Windows application for that website, it would have been great. Usually we bookmark the sites in the browser and use them to open the sites but what if I tell you that you can easily turn any website into a Windows application and can access the app right from your start menu or a desktop shortcut? It would really be easy to access your favorite websites without searching them in the bookmarks because you would be able to open them as an app using their own app icon in your start meu.
Following are the steps to do in just in seconds:
  1. Open Edge browser in your Windows 10 computer and open the website which you want to convert into an application.
  2. Now from the top right corner, you need to click on the three dots or press Alt+F keys together to open the browser menu.
  3. Now click on "Apps" in the menu and then click on "Install this site as an app".
  4. A prompt will pop-up on the screen asking you to name the app, just type the name of the app and then press enter.
  5. That's it, you can now access the website as an app from your start menu.
Below is the video demonstration for the whole procedure.

Keep visiting for more tips and tricks.
Share:

Thursday, 24 June 2021

Brave Browser : The Best Browser

Brave Browser : The Best Browser
In our day to day life, web browsers play a very important role which we don't even realize. From surfing internet to watching youtube videos, we use web browsers. Google chrome is the most popular web browser and majority of the internet users use this browser. But you might have heard a lot of complaints that Google Chrome uses maximum resources of the computer and if you open multiple tabs in it, is gets frozen or makes the PC very slow.

To overcome this problem, some companies tried to use the source code of Google Chrome and developed several Chromium based web browsers but they all couldn't do well. Even Microsoft used Chromium source code and enhanced its Edge browser which improved its performance a lot. But still it could not beat the best browser of all time, which is "Brave" browser.

Brave browser is made using chromium source code and in terms of speed and features, it is the best among all browsers. Not only this, you can earn BAT crypto tokens which you can transfer to your crypto wallets and sell it and cash it out. Isn't it cool getting free crypto tokens just by using your web browser for your in your day to day internet usage?

>>>DOWNLOAD BRAVE BROWSER FROM HERE<<<

Following are some of the features of the brave browser:

  • In built adblocker which is very powerful in blocking youtube ads, web ads, search result ads and any kind of ads which may interrupt your web browsing experience.
  • As compared with the other browsers, Brave is 40% faster and it doesn't consume much amount of RAM even if you open multiple tabs.
  • It has very strict privacy features which protect you from being tracked and from malicious cookies.
  • For browsing websites, it rewards you with BAT crypto tokens.
  • You can use all chrome extensions in Brave browser.

I would definitely suggest you to install Brave browser and use it as I am personally using it from long time and it is surprisingly good. With the time, Brave browser keeps getting better and better, thanks to the amazing developer team.

>>>DOWNLOAD BRAVE BROWSER FROM THIS LINK<<<

For more tips and tricks, keep visiting pctricksguru.com

Share:

Saturday, 22 May 2021

Cannot connect to the virtual machine, try to connect again : Fix error with HyperV

Cannot connect to the virtual machine, try to connect again : Fix error with HyperV
If you are a network engineer or an instructor who uses Virtual machine to run several ISOs, you might face issues in creating virtual machine using HyperV in Windows 10. You may get the error "Cannot connect to the virtual machine. Try to connect again. If the problem persists, contact your system administrator. Would you like to try connecting again?"

There are so many suggestions available online which suggest to change the date and time of the system, reinstall HyperV, delete the existing virtual machine and re-setup it, clear the DNS cache of the system etc but none of the would work. This issue is actually because of an old bug in Windows 10 and just a minor change can fix the issue easily. Let me guide you through the steps to easily resolve the problem:

  1. Open cmd with admin and run the command netstat -ano | find "2179" and check if the virtual machine management service is listening to this port, I'm sure you would not get any result after running the command.
    not listening to port
  2. Open HyperV and right click on your virtual machine and click on Turn Off.
  3. Now open registry editor by running regedit command in RUN and then navigate to HKEY_LOCAL_MACHINE\SOFTWARE\Microsoft\Windows NT\CurrentVersion\Virtualization and look for the DWORD "ListenerPort".
  4. Double click on "ListenerPort" and click on "Decimal" and change the value to 21791 and click OK.
    modify registry
  5. Now close registry editor and open PowerShell as administrator.
  6. Type the following commands in powershell to stop and start vmmc service:
    Stop-Service vmms
    Start-Service vmms
  7. Now close powershell and open cmd with admin and run the following command again: netstat -ano | find "21791" and this time, you would see that vmmc is listening to the port number 21791.
    listening to port
  8. Now close cmd and then try connecting to your virtual machine through HyperV, it would get connected and you would be able to run your virtual machine without any errors.
    hyperv connecting

That's all for today. Keep visiting PC Tricks Guru for more tips and tricks.

Share:

Tuesday, 29 September 2020

Windows 10 Lock Screen Dimming : Fix

Windows 10 Lock Screen Dimming : Fix
Recently, several users of Windows 10 complaint about a strange issue, which is causing the Windows 10 lock screen go dimmer. There was no such setting in Windows 10 which could do it so it was completely strange that why is it happening. So after a lot of research and tests, I finally found the real cause of the issue.

The problem persists only in Lenovo devices and it is happening because of an "Enhancement" which its OEM software is applying to the device. Follow these steps to fix the issue:

  • Open Lenovo Vantage software which is pre-installed in your Lenovo device.
  • Click on "Hardware Settings".
  • Click on "Audio/Visual" and then turn off "Enable Dynamic Brightness Control".
That's it. The issue would be resolved and you would no longer notice dimming of lock screen wallpaper.

Share:

Monday, 1 June 2020

How to uninstall Cortana from Windows 10 May 2020 Update (v2004)


How to uninstall Cortana from Windows 10 May 2020 Update (v2004)
Cortana is Microsoft's virtual digital assistant and most of the Windows 10 users don't like it. The popularity of Cortana is very low if we compare it with Siri, Alexa or Google. Microsoft has not given the users to uninstall Cortana and the non-techy users have no option other than to live with Cortana installed on their computer.
With the rollout of Windows 10 May 2020 update, Microsoft has separated Cortana as a completely separate app but again, there is no option to uninstall it. But no need to worry, if you want to uninstall it from your computer, I am sharing the easiest and quickest way to uninstall Cortana from Windows 10 May 2020 update. Follow the steps given below:
1. Click on the start button and search for Windows PowerShell and open it as administrator.
2. Now copy and paste the following command in PowerShell and press enter key.
Get-AppxPackage -allusers Microsoft.549981C3F5F10 | Remove-AppxPackage
3. That's it, you would see that Cortana would be uninstalled from your device in a few seconds.
4. You can now use your Windows without Cortana.

I have created a short video to demonstrate this method, you may check it below:
Keep visiting for more tips and tricks.
Share:

Monday, 23 March 2020

Download Offline Installer for Microsoft Edge Chromium

Download Offline Installer for Microsoft Edge Chromium
Microsoft has recently introduced the faster and better Edge browser which is based on Google's chromium source code. The new Edge browser supports all the extensions downloaded through Google store and it is very smooth and fast, even better than Google's own Chrome browser because the new Edge consumes fewer resources than the Google Chrome browser.
To install Edge, you can download the click to run the installer for the edge but if you don't want to perform an online installation and want to use the complete standalone installer instead, I'll guide you the steps to download the complete installation package of Edge Chromium browser.

1. Open this link: https://www.microsoft.com/en-us/edge/business/download
2. Now select the Channel/Build (select the most recent stable build), select the system architecture and then click on the "Download" option.
Download Offline Installer for Microsoft Edge Chromium
3. Now accept the license agreement and your download would begin.
4. Once the download gets completed, run the setup to install the Edge Chromium browser and enjoy the best web browser by Microsoft.
Share:

Activate Windows 10 For Free Using KMS Client Keys

Activate Windows 10 For Free Using KMS Client Keys
Windows 10 is the latest and final Windows OS by Microsoft. Microsoft offered a free upgrade to Windows 10 for one year after its launch but luckily if you are using the genuine license of Windows 7 or 8.1, you can still upgrade to Windows 10 for free without paying a single penny (Using Windows media creation tool). But if you don't have a genuine Windows 7/8.1 license and you still want to use Windows 10 or if your device came with Linux and if you want to use Windows 10 then you can activate your copy of Windows 10 just by using a few commands. Microsoft offers KMS Client keys to install Windows OS as a volume license to try it and using the same keys, you can keep your copy of Windows activated forever. Following is the list of Windows 10 KMS Client keys which you can use with your machine:
  • Windows 10 Home: TX9XD-98N7V-6WMQ6-BX7FG-H8Q99
  • Windows 10 Home N: 3KHY7-WNT83-DGQKR-F7HPR-844BM
  • Windows 10 Home Single Language: 7HNRX-D7KGG-3K4RQ-4WPJ4-YTDFH
  • Windows 10 Home Country Specific: PVMJN-6DFY6-9CCP6-7BKTT-D3WVR
  • Windows 10 Professional: W269N-WFGWX-YVC9B-4J6C9-T83GX
  • Windows 10 Professional N: MH37W-N47XK-V7XM9-C7227-GCQG9
  • Windows 10 Education: NW6C2-QMPVW-D7KKK-3GKT6-VCFB2
  • Windows 10 Education N: 2WH4N-8QGBV-H22JP-CT43Q-MDWWJ
  • Windows 10 Enterprise: NPPR9-FWDCX-D2C8J-H872K-2YT43
  • Windows 10 Enterprise N: DPH2V-TTNVB-4X9Q3-TJR4H-KHJW4
Note: These keys are not pirated or stolen keys. They are officially shared by Microsoft in the KMS Client Setup documentation which can be accessed from this link.

Now let's see how can you activate your Windows 10 copy using these keys for free. First of all, you need to check which Windows version have you installed. In this article, I'll take an example of Windows 10 Home. So now as we know we have installed Windows 10 Home, we would need to install the KMS Client key for Windows 10 Home in our machine. To do so, follow the steps below:

1. Open command prompt in elevated mode (Search for cmd in Start and right-click over it and click on Run As Administrator)
run cmd as admin
2. Now run the following command as per your Windows edition to install the KMS Client Key:
slmgr /ipk TX9XD-98N7V-6WMQ6-BX7FG-H8Q99

install Windows 10 product key
Note: I have assumed we are using Windows 10 Home so I used the key for Windows 10 Home. You may use the key as per your Windows edition. Running this command will install Windows key in your machine.
3. Now we need to connect to KMS server. If you already have set-up your own KMS Server, you may use your own url for KMS Server. If you don't have it, then use the following command to connect to KMS Server provided by msguides:
slmgr /skms kms8.msguides.com

connect to KMS server
4. After running this command, we need to activate Windows. To do so, run the following command:
slmgr /ato

activate Windows 10 for free
5. That's it. Your Windows 10 copy is now activated and you can use it without any issues.

Keep visiting for more tips and tricks.
Share:

Monday, 16 December 2019

Fix the error: "Computer policy could not be updated successfully, The processing of Group Policy failed"

Fix the error: "Computer policy could not be updated successfully, The processing of Group Policy failed"
In Windows, we can use gpupdate.exe command to forcefully update the group policy changes. While using this command, if you are getting the error message "Computer policy could not be updated successfully, The processing of Group Policy failed", then to fix this issue, you would need to follow some simple steps as mentioned below:
  1. Exit out of command prompt and close any opened files and folders.
  2. Now navigate to the following path: C:\Windows\System32\GroupPolicy\Machine
  3. In the Machine folder, you would find a file named "Registry.pol", just rename this file to "Registry.bak".
  4. Now restart your computer and then try to run the gpudate.exe command in the elevated window of the command prompt, the issue won't appear now.
That's it. This was how to fix the error: "Computer policy could not be updated successfully, The processing of Group Policy failed". Keep visiting for more tips and tricks.
Share:

Monday, 1 July 2019

Fix wrong clock time in Windows 10

Fix wrong clock time in Windows 10
If your Windows clock is showing the wrong time in the taskbar, you may fix the wrong clock time by using the following methods.

1. Change date and time settings
Click on the start button and click on the gear icon to open settings. After "Settings" is opened, click "Time and Language" and then "Date and Time". Now turn on the "Set time automatically" and "Set time zone automatically" options and check if this fixes your issue. If it doesn't, turn off both the options and set the time and time zone manually.
windows date and time setting

2. Start the Windows time service
Press Windows and R keys together to open RUN. Now in the RUN box, type services.msc and it would open the list of Windows services. Now look for "Windows time" and double click on it. After double-clicking on it, Windows time properties would open. Set the startup type to Automatic and then click on Start to start the service, then click Apply and then click OK.
windows services
windows time properties

3. Change internet time server
To change the internet time server, open control panel. Now click on "Clock and Region > Set the time and date > Internet Time > Change Settings". Now change the time server to time.nist.gov and click "Update Now" and then click OK and OK.
change internet time server

4. Re-register Windows time dll file
To re-register windows time dll file, open command prompt as admin and run the following command:
regsvr32 w32time.dll

5. Re-register Windows time process
To re-register windows time process, open command prompt as admin and run the following commands one by one:
net stop w32time
w32tm /unregister
w32tm /register

6. Force windows to sync time through the command prompt
To force windows to sync time through cmd, open command prompt as admin and run the following commands one by one:
net stop w32time
w32tm /unregister
w32tm /register
net start w32time
w32tm /resync
After running these commands, restart your computer and check if it helps.

7. Change the CMOS Battery
If none of the above methods work, consider replacing your motherboard's CMOS battery. After replacing the CMOS battery, the date and time should function normally. To get the battery replaced, you may visit any local repair shop or if you have the knowledge of CMOS battery replacement, you may buy a CMOS battery and replace it with your motherboard's battery.

For more tips and tricks, keep visiting PC Tricks Guru.
Share:

Friday, 21 June 2019

How to fetch Product Key of Windows 7/8.1/10 if COA is not available

How to fetch Product Key of Windows
Windows product keys are very important to keep because if we reinstall Windows or change the hardware of the machine, we would need to re-activate Windows and it requires the product key of Windows. Without the product key, you won't be able to activate Windows. Although Windows 10 activation is now digitally linked with Microsoft account but still, after changing the hardware, you might face issues with the activation of your Windows OS. So here are a few steps which you can follow to fetch the product key of the Windows operating system from the installed machine.

1. Using Command Prompt
To fetch the product key using the command prompt, you may open cmd as admin and run the following command:
wmic path softwarelicensingservice get OA3xOriginalProductKey
Remember that this command can fetch the product key only if you are using an OEM machine which came pre-installed with Windows and the key was injected in the Motherboard of the machine.

2. Using PowerShell
To fetch the product key using the PowerShell, you may open PowerShell as admin and run the following command:
powershell "(Get-WmiObject -query ‘select * from SoftwareLicensingService’).OA3xOriginalProductKey"
Remember that this command can fetch the product key only if you are using an OEM machine which came pre-installed with Windows and the key was injected in the Motherboard of the machine.

3. Using VB Script
To fetch the product key using the VB Script, you may copy and paste the following code in a notepad file and save it as keyfinder.vbs and then run the file. It would show the product key in a small pop-up:

Set WshShell = CreateObject("WScript.Shell")
MsgBox ConvertToKey(WshShell.RegRead("HKLM\SOFTWARE\Microsoft\Windows NT\CurrentVersion\DigitalProductId"))

Function ConvertToKey(Key)
Const KeyOffset = 52
i = 28
Chars = "BCDFGHJKMPQRTVWXY2346789"
Do
Cur = 0
x = 14
Do
Cur = Cur * 256
Cur = Key(x + KeyOffset) + Cur
Key(x + KeyOffset) = (Cur \ 24) And 255
Cur = Cur Mod 24
x = x -1
Loop While x >= 0
i = i -1
KeyOutput = Mid(Chars, Cur + 1, 1) & KeyOutput
If (((29 - i) Mod 6) = 0) And (i <> -1) Then
i = i -1
KeyOutput = "-" & KeyOutput
End If
Loop While i >= 0
ConvertToKey = KeyOutput
End Function

This command can fetch product key from OEM and non OEM PCs both.

4. Using the ProduKey tool
If none of the above methods work, you may use the NirSoft ProduKey tool to fetch the product key of your Windows. This tool can fetch the keys of Windows and MS Office also. Just download the tool from this link and run it as admin in your PC and it would show the product keys installed in your machine.
Share:

Friday, 1 March 2019

Fix error 0xc03f6506 while upgrading from Windows 10 Home to Pro

Windows 10 Home comes preinstalled with many computers and most of the home users are offered Windows 10 Home but Windows 10 Pro has more features than Windows 10 Home. So users sometimes want to upgrade to Windows 10 Pro from Windows 10 Home and while doing so, they could encounter error code 0xc03f6506.

Fix error 0xc03f6506 while upgrading from Windows 10 Home to Pro

1. Using registry editor
If you have upgraded to Windows 10 Pro and you are getting this error code while the activation of Windows, you may fix this issue by making a small modification in Windows registry. Follow the steps given below:
> Press windows key + R to open RUN and type regedit and hit enter.
> After opening the registry editor, navigate to
Computer\HKEY_LOCAL_MACHINE\SOFTWARE\Microsoft\Windows NT\CurrentVersion
> Now look for a DWORD named EditionID. Double click on it and change its value to Windows 10 Professional.
> Now look for another DWORD named as ProductName. Double click on this as well and change its value to Windows 10 Professional.
> Now restart your computer and try activating the Windows, it should be activated now.

2. Using command prompt
For this method, you need to get a bootable USB flash drive. If you have a bootable flash drive for Windows 10, follow the steps below to upgrade your Windows 10 edition and activate it:
> Plug in the Windows 10 installation USB media.
> Now launch the command prompt with admin rights.
> Suppose your USB drive is assigned the letter H, then in command prompt, type H: and hit enter to select the H: drive.
> Now type this command and press enter:
setup.exe /auto upgrade /pkey <YOUR WINDOWS 10 PRO EDITION PRODUCT KEY>
> Your Windows edition would be changed now and if your key is genuine, it would be activated.

3. By disabling the Internet
If you are not able to upgrade to Windows 10 Pro from Windows 10 Home, just disconnect your computer from the internet and try upgrading the edition using your product key. It should be upgraded without any errors. Later on, you can activate it by connecting your PC to the internet.

Keep visiting for more tips and tricks.
Share:

Sunday, 24 February 2019

How to reset each Windows Update Component to default manually

How to reset each Windows Update Component to default manually
Most of the times, we face issues with Windows updates. There are several error codes related to Windows updates and most of the times, they get fixed by running Windows Update troubleshooter. But sometimes, if the Windows update components get corrupted, we need to reset the Windows update component to default by performing some manual actions which include running commands to reset windows update components. In this article, I will mention the steps to reset the Windows Update component to default:

1. Windows Updates work properly if three windows services work properly. These three services are Background Intelligent Transfer Service, Windows Update and Cryptographic Services. There are a few more services that are responsible for proper functioning of Windows updates but we won't have to worry about them. So the first task would be, disabling these services. To disable these services, open cmd with admin rights and run the following commands:
net stop bits
net stop wuauserv
net stop appidsvc
net stop cryptsvc

2. Next step is, to delete the qmgr*.dat files. In order to do so, run the following command in elevated command prompt window:
Del "%ALLUSERSPROFILE%\Application Data\Microsoft\Network\Downloader\qmgr*.dat"
(This step can be skipped if you are trying to resolve the windows updates issues for the first time. This step is suggested to be used only if everything has failed and you have no option left to troubleshoot windows updates issue)

3. SoftwareDisribution and Catroot2 folders store the downloaded update files and some old unwanted cache also remains in these folders. So we will rename these folders and will create new copies of these folders now. To do so, run the following commands in elevated command prompt window:
Ren %systemroot%\SoftwareDistribution SoftwareDistribution.bak
Ren %systemroot%\system32\catroot2 catroot2.bak

4. Now we need to reset the BITS service and the Windows Update service to the default security descriptor. To do so, run the following commands in elevated command prompt:
sc.exe sdset bits D:(A;;CCLCSWRPWPDTLOCRRC;;;SY)(A;;CCDCLCSWRPWPDTLOCRSDRCWDWO;;;BA)(A;;CCLCSWLOCRRC;;;AU)(A;;CCLCSWRPWPDTLOCRRC;;;PU)
sc.exe sdset wuauserv D:(A;;CCLCSWRPWPDTLOCRRC;;;SY)(A;;CCDCLCSWRPWPDTLOCRSDRCWDWO;;;BA)(A;;CCLCSWLOCRRC;;;AU)(A;;CCLCSWRPWPDTLOCRRC;;;PU)

5. Now run the following commands one by one in the elevated cmd window to re-register the Windows Updates related dll files:
cd /d %windir%\system32
regsvr32.exe atl.dll
regsvr32.exe urlmon.dll
regsvr32.exe mshtml.dll
regsvr32.exe shdocvw.dll
regsvr32.exe browseui.dll
regsvr32.exe jscript.dll
regsvr32.exe vbscript.dll
regsvr32.exe scrrun.dll
regsvr32.exe msxml.dll
regsvr32.exe msxml3.dll
regsvr32.exe msxml6.dll
regsvr32.exe actxprxy.dll
regsvr32.exe softpub.dll
regsvr32.exe wintrust.dll
regsvr32.exe dssenh.dll
regsvr32.exe rsaenh.dll
regsvr32.exe gpkcsp.dll
regsvr32.exe sccbase.dll
regsvr32.exe slbcsp.dll
regsvr32.exe cryptdlg.dll
regsvr32.exe oleaut32.dll
regsvr32.exe ole32.dll
regsvr32.exe shell32.dll
regsvr32.exe initpki.dll
regsvr32.exe wuapi.dll
regsvr32.exe wuaueng.dll
regsvr32.exe wuaueng1.dll
regsvr32.exe wucltui.dll
regsvr32.exe wups.dll
regsvr32.exe wups2.dll
regsvr32.exe wuweb.dll
regsvr32.exe qmgr.dll
regsvr32.exe qmgrprxy.dll
regsvr32.exe wucltux.dll
regsvr32.exe muweb.dll
regsvr32.exe wuwebv.dll

6. Now we need to delete the incorrect registry values. To do so, open registry editor by running regedit in the Run box and locate the path HKEY_LOCAL_MACHINE\COMPONENTS
Now in the right pane, delete the following keys and restart your computer:
PendingXmlIdentifier
NextQueueEntryIndex
AdvancedInstallersNeedResolving
Note: If these are not available in your Windows registry, skip this step.

7. Now reset the Winsock by running the following command:
netsh winsock reset

8. Now we need to start the Background Intelligent Transfer Service, Windows Update and Cryptographic Services. To do so, run the following commands in elevated command prompt window:
net start bits
net start wuauserv
net start appidsvc
net start cryptsvc

9. Now make sure you have installed the latest Windows Update Agent in your machine if you are using Windows 7/8/8.1
Read this article to manually update your Windows Update Agent: https://support.microsoft.com/en-in/help/949104/how-to-update-the-windows-update-agent-to-the-latest-version

10. Finally, reatart your computer and try installing Windows updates. There should not be any errors now.

Keep visiting PC Tricks Guru for more troubleshooting guides.
Share:

Fix Windows Update Error 0x8024000B for Windows 10

Fix Windows Update Error 0x8024000B for Windows 10

Windows update error 0x8024000B occurs when Windows cannot read the Update Manifest file required for installing the updates. It means that the update is either canceled by Windows services or the user. To fix this error, we have simple steps available which you can try.

Fix Windows Update Error 0x8024000B for Windows 10 

1. Run Cleanup (Decline) Superseded updates PowerShell script
The poweshell script to fix this error is shared on the Microsoft Technet website. You may download the fixit tool from here: https://gallery.technet.microsoft.com/scriptcenter/Cleanup-WSUS-server-4424c9d6. Just download the tool and run it and then restart your computer. After restarting the computer, check if the error still appears.

2. Rename the Spupdsvc.exe file
To rename the Spupdsvc.exe file, run the following command in run box by pressing Win+R keys and restart your computer. Then check if the error still persists.
cmd /c ren %systemroot%\System32\Spupdsvc.exe Spupdsvc.old

3. Run the Windows Update troubleshooter
Go to Start > Settings > Updates and Security > Troubleshoot. Now select and run the Windows Updates Troubleshooter and restart your computer once done. Then check for updates and check if the issue still remains the same.

In most of the cases, the error code 0x8024000B gets resolved by following any of the three options mentioned above. Keep visiting PC Tricks Guru for more tips and tricks and troubleshooting guides.
Share:

How to fix windows update error code : 0x8024000E

0x8024000E

If you are trying to update your Windows 10 device and if you get the error code 0x8024000E, then there is a possibility that Windows update agent is corrupt. When Windows update agent doesn't work properly, it is unable to read the update.xml file that contains information about system and driver updates.

Fix windows update error code : 0x8024000E

1. Run the Windows Update Troubleshooter:
> Click on Start button and type Troubleshoot and from the search results, open "Troubleshoot settings".
> Now under "Get up and running" section, click on "Windows update" and click "Run the troubleshooter"
windows update troubleshooter
> Check if the error is still appearing after running the troubleshooter.

2. Clean the Windows update temporary cache files
> Open C:\Windows\SoftareDistribution\Download and delete all the files from this folder. Do the same for C:\Windows\SoftareDistribution\DataStore folder as well.
> Now restart your computer and then check if the error still persists.

3. Reset Windows update agent
> Download and run the tool from https://gallery.technet.microsoft.com/scriptcenter/Reset-Windows-Update-Agent-d824badc
Reset Windows update agent
> Restart your computer and check if the error has been fixed.
Share:

Sunday, 27 January 2019

How to turn ON or OFF security questions in Windows 10

How to turn ON or OFF security questions
Microsoft recently introduced Security questions to recover password for a local account in Windows 10. This feature is great in case you forget your login password, but for some people, it is annoying as it takes a little longer to create new user accounts. So if you want to enable or disable Security Questions from Windows 10, you can use the following options:

Using the Windows Registry Editor:
  • Press Win+R keys to open RUN and type regedit and click OK.
  • Now navigate to HKEY_LOCAL_MACHINE\SOFTWARE\Policies\Microsoft\Windows\System
  • Now right click in the blank panel at the right side and right click and create a new DWORD value by New > DWORD (32-bit) Value.
  • Name the newly created value as NoLocalPasswordResetQuestions
  • Double click on the newly created DWORD and set its value as 1 to disable the Security Questions. If you set the DWORD value as 0, it would enable the security questions.
registry editor
  • Now exit the registry and restart your computer for the changes to take effect.
Using the Group Policy Editor:
  • Press Win+R keys to open RUN and type gpedit.msc and click OK. It would open the group policy editor.
  • Now navigate to Computer Configuration > Administrative Templates > Windows Components > Credential User Interface
Group Policy Editor
  • Now, at the right side panel, double click on "Prevent the use of security questions for local accounts" and check the radio button to "Enabled" option. Enabling this option would turn off the security questions.
  • If you disable the "Prevent the use of security questions for local accounts" option, password reset through security questions feature would be enabled.
Prevent the use of security questions for local accounts
  • Now exit the Group Policy Editor and restart your computer for the changes to take effect.
Using the above two methods, you may disable or enable Windows 10 Password Recovery security questions.
For more tips and tricks, keep visiting PC Tricks Guru.
Share:

Wednesday, 10 October 2018

How to recover files deleted by Windows 10 October 2018 Update aka v1809 update

recover files deleted by Windows 10 October 2018 Update aka v1809 update
Microsoft recently rolled out its Windows 10 October 2018 update which changes the Windows version to 1809 but things didn't go well, as expected. It is not a new thing when Microsoft Windows 10 updates messes with the PCs so I'm actually not too surprised if the update deleted the user files. Recovering files deleted by Windows 10 October 2018 Update is getting hard for users and Microsoft both. After the complaints received by users, Microsoft paused the update and stared working on the fix. The bug has been fixed and Microsoft is testing it among the insiders to get more feedback from the insiders.
It is strange that the bug was already reported to Microsoft months ago by so many Insiders but without paying attention to the reports, Microsoft rolled out the update which caused data loss for many users. As Microsoft says, the data loss issue was tied to a Windows 10 feature known as "Known Folder Redirection". Because of the malfunction of this feature, new folders like "Documents", "Pictures" etc were created and the old folders were erased which took away the data stored in those folders. Microsoft representatives say that Microsoft Tech Support team has tools to recover the data but the truth is, the Tech Support guys are completely clueless about any such tool. In Microsoft, tech support guys aren't allowed to use any third party software which makes it really difficult for them to fix the issues quickly. For example, if your PC runs slow, Microsoft Tech Support executive would use "System Internal Tools" provided by Microsoft but that is not very effective. You can speed up your PC just in 5 minutes if you use any third party tool like AVG PC Tuneup Utility. But let's not talk about these things, let's know how to recover your deleted files:

Recover files deleted by Windows 10 October 2018 Update

recuva
As per my knowledge, if you try to perform system restore or switch back to previous version of Windows, you won't get your files back deleted by the Windows 10 October 2018 update, but still you are in luck because you can use a few tools, or better to say, data recovery tools to bring your files back from the dead. There are so many free and paid data recovery tools available in the market so it is upto you that whether you want to use the free software or the paid one. If you want to use the free tool, I would recommend using "Piriform Recuva". This tool can really be a life saver for the users who lost their files because of the Windows 10 October 2018 update. Not only this, you can recover any other file too which you accidentally deleted and is no longer available in the recycle bin. You can use "Wise Data Recovery" too as an alternative and this tool also is available for free.

If you want to go for the paid software, you may use "OnTrack EasyRecovery Professional" software. This is a great software which can recover big files too. As an alternative, you may use "EaseUS Data Recovery Wizard Pro" and "Disk Drill Professional" software too.

One more way is there which doesn't work most of the times, but you may give it a try. Just right click on the Documents folder and click "Restore Previous Version" and check if your have any old version of the folder available. If yes, then select the old version from the list and click "Restore".

If you use any of these tools to recover your files, I'm sure you would get your data back which was deleted by the Windows 10 October 2018 Update. I'd recommend using the free tools which I mentioned in the post to make sure that your data is still recoverable. Because using the affected PC would replace the recoverable files and make it difficult to recover them. So avoid using the PC if the files were deleted and run the data recovery tools as soon as possible to avoid the permanent loss of your data.
Share:

Wednesday, 2 May 2018

Windows 10 April 2018 Update : New Features

Windows 10 April 2018 Update : New Features
Windows 10 April 2018 update is already out for the Windows 10 devices and it has got some great improvements over the previous versions of it. If you have still not received the update, open settings and check for the update manually to get the update and if the update is still not available for your PC, you may download and install it manually using Windows 10 update assistant.
I installed the update in my laptop and the installation went smooth and I didn't notice and errors or bugs during the installation. The previous windows updates, especially monthly cumulative updates caused lots of problems during installation but the Windows 10 April 2018 update (Feature update to Windows 10, version 1803) installed easily.
After it got installed, It's welcome screen opened with Edge browser and I noticed improvements in display resolution and windows graphical elements. The new Windows 10 April 2018 update has a few new features as well which I'll mention below. With this update, Microsoft has removed a few features too which you can check In This MS Document. Let's have a look on what's new in Windows 10 April 2018 Update.

1. TIMELINE
Timeline replaces the familiar "Task View" button that shows what apps are currently running. Timeline as well, shows the list of what apps are running and along with that, it shows the history of activities and apps you've used in the past 30 days. These activities and apps sync across multiple devices and you can easily pick the same activity in any device you are signed into with your Microsoft account.

2. DICTATION
This feaure of Windows 10 is like speech to text but is more accurate and easy to access. If your computer's default language is set to English-US, you can use the dictation feature by pressing Windows + H keys together. If you have a good mic, you can write a whole document just by speaking the sentences. I'm impressed with the accuracy of the dictation tool, it is amazing (you should have a clear English accent to use this feature efficiently)

3. MICROSOFT EDGE TAB MUTING
Google chrome has added this feature recently, and Microsoft also brings the feature to it's Edge browser with April 2018 update. Using this feature, you can mute loud and annoying websites (with autoplay enabled video ads). Edge certainly seems to be a better option for browsing the web with this feature, but still it couldn't compete with chrome and requires improvements.

4. FIX BLURRY APPS
In windows 10, you might have noticed that scaling some of the apps in windows 10 makes them blurry. With this update, Microsoft has fixed the issue and the apps will be auto adjusted to look sharp and clear even after scaling them or changing the monitor.

5. SEPARATE PREFERENCES FOR DIFFERENT APPS
This is a great feature that has been added in Windows 10 April 2018 update. You can now set input and output devices per application. For example, you can set your woofers for Spotify app and can set headphones for browser. In the same way, you can set your desk mic for podcasting app and studio mic for your music recording software at the same time.

6. QUICK BLUETOOTH PAIRING
Microsoft has added quick notification for pairing Bluetooth accessories. Whenever a Bluetooth peripheral would be in range, Windows will produce a notification to quickly connect to the Bluetooth peripheral (such as Bluetooth mouse).

7. LESS NOTIFICATIONS FOR WINDOWS DEFENDER
Windows defender scan notifications are really annoying sometimes and with this update, Microsoft has reduced these notifications. You can now suppress these notifications and get rid of the windows defender notifications after every successful scan.

8. NEARBY SHARING
This is a feature similar to Apple's AirDrop that allows you to share files with nearby Bluetooth enabled devices. Nearby sharing lets you easily share website, photos or documents to any nearby Windows 10 machine. This feature is disabled by default in Windows 10 and you can enable it from settings.

9. FOCUS ASSIST
Microsoft's "Quiet Hours" is now "Focus Assist". It is same as the Airplane Mode of Android. Focus Assist will mute all the notifications when you are busy and don't want to be disturbed. You still have a choice to allow particular apps of your choice to show notifications while the Focus Assist is active.

10. MANUAL GAMING PERFORMANCE
With Windows 10 April 2018 update, you can customize graphics performance per game. Using this feature, you can set games to High Performance or Power Saving. This feature is useful if you want to play a game allowing it to use limited graphics resources to save battery.

If you have installed the new Windows 10 April 2018 update, share your experience with it in the comments. If there are any issues with your PC after installing it, please let me know and I'll try to get some troubleshooting steps to fix those issues.
Share:

Custom Search Box

Blog Archive

Contact Form

Name

Email *

Message *